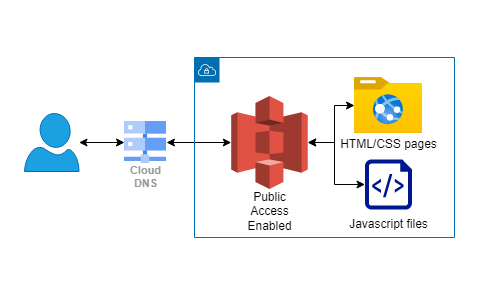
Implementation Lessons

This is not a complex deployment, but it does require a few settings to be adjusted to make sure your bucket is public and that you will not make any cross site requests. Or if you do that you will enable Cross-origin resource sharing (CORS).

Making your bucket public

By default, all S3 buckets are private and have public access disabled. You must specifically uncheck the public access blocking options under permissions for the bucket before anyone will be able to view the files inside of it.

Set bucket policy to allow anonymous reads

Simply disabling the public blocking is not enough to allow reading the bucket contents. You also need to set the buckets policy to allow public anonymous GET requests. This can be set in the permissions tab of the buckets details in the portal.

Enable static hosting

You will need to explicitly turn on the option to host webpages in your S3 bucket. You will need to set a landing page and will be able to set an error page as well. Doing this will generate a URL that you can use to access your pages.

Set up domain forwarding

In google domains you can set a permanent forwarding with or without path forwarding. In this case I used a permanent forward and do not have it forwarding the path.


Retrospective

Setting up a static webpage with a custom domain is a common project in S3. Typically, people will use Route 53 the AWS domain service to create and manage the domain as well as setting up a Content Distribution Network (CDN) which on AWS is offered as CloudFront.

In my case I already had a domain registered with google and was able to simply set forwarding to the URL that AWS generates when you enable Static hosting. I don’t expect to have enough traffic to warrant setting up a CDN. The drawback of not adding CloudFront is that using it would allow me to configure a security certificate that would allow using HTTPS on my pages. This and the lessons from setting up a new domain in route 53 mean I may revisit this as a test project later.